


Powerpoint
-
Posts
43 -
Joined
-
Last visited
Content Type
Profiles
Forums
Events
Everything posted by Powerpoint
-
Hi I'm trying to find a parts catalog for the IH 475 but the ones I find are mostly in the UK and "can't" ship to the EU due to new environmental regulations or something else. I did see one from Australia though. It has a different cover on the book and it says "INTERNATIONAL HARVESTER 475 TRACTOR, BT-33, Australia limited". Does anyone know why they made that note on the cover? Is it a different part numbers or was the IH475 even built differently for Australia? Thanks
-
My tractor had a major clutch failure and I then chose to also renovate the TA. It turned out to be a multi-year hobby renovation and most of the wear parts in the gearbox have been replaced. I'm going to start assembling everything again but I'm worried about the TA pump. It feels sluggish when I rotate it by hand, and I don't know if that's how it's supposed to feel. I don't know if it was a problem before the breakdown because I didn't own the tractor at the time. I know that it got slower/weaker in the hydraulics in general, but it's the other pump if so. The fact that my TA pump is not smooth when turning the gear may be due to how I stored it during the period, I don't remember if I sprayed WD40 as rust protection, I have cleaned it in diesel. My question is. Can a bad pump damage my newly renovated TA? Should I replace it just to be safe? Can it be tested on the bench? Pump ID 402540R91 (402540R92) Thanks
-
Is the Pilot Bearing Installed Correctly?
Powerpoint replied to Powerpoint's topic in Technical IH Talk
Good idea to check the driveshaft — I couldn’t feel or see any wear, and the old bearing wasn’t close to the end.
-
Is the Pilot Bearing Installed Correctly?
Powerpoint replied to Powerpoint's topic in Technical IH Talk
Hello again. I didn't want to take it apart until I had what I needed to finish it. But today I removed the old bearing and when I cleaned the flywheel I found a ring at the bottom. The old bearing is complete so the ring is not from it. In my imagination it could either be leftovers from a previous bearing change and that they didn't tap in the new bearing properly. - Or maybe there was a fix for something, maybe they wanted to get the bearing out to stabilize the shaft more or something like that. The bearing is 0.550in (13.98mm) The depth of the flywheel is 0.551in (13,99mm) The ring is 0.049in (1.25mm) * The brown on the flywheel is WD40 as rust protection. * The flywheel is said to be specially made during a temporary collaboration between Volvo and IH where Volvo bought a Perkins engine and IH gearbox.
-
Hi. I noticed that my pilot bearing is sticking out of the flywheel (0.110in) instead of being pressed in flush with the flywheel. I thought it looked strange so I checked the manual, which says "Ensure the pilot bearing is pressed fully into the flywheel". I'm curious, do you think this pilot bearing is installed correctly? Thanks

-
Rear PTO shaft seal (Case 166972R1) — dimensions & comparison
Powerpoint replied to Powerpoint's topic in Technical IH Talk
I am working on a (red) Volvo BM T500. Volvo and IH worked together so it has an IH gearbox. Most say it is IH475, but some say 574. Most parts seem to share the same ID. According to https://www.mdeagriparts.co.uk/product/46071/seal-ring-166972r1/CA166972R1/ the 166972R1 seal is for both 475 and 574. But I am curious if 88574C1 might have the same dimensions and that it would be an upgrade to get Teflon seals instead. -
Hello. I am looking for two seals for the rear PTO shaft. The picture shows IH547, and a forum says that part number 19 is 166972R1. From what I understand, the IH475 has the same gearbox and parts? Does anyone have a parts catalog for the IH475? What dimensions does Case 166972R1 have? Could it be the same dimensions as case 88574C1? It is made of Teflon. I don't know if it is better or worse than metal? Thanks

-
The Swedish manual for mounting the TA [IH475] in the gearbox shows that I should lock the discs using two tools, one I guess helps to center internally, then there are springs that probably locks the discs in the correct position when you insert it and meet the gear in the gearbox. These tools probably don't exist today. I have a few alternative ideas, but I think most people might just use their hand to center the discs as they go while you slowly insert the TA. How would you have done it? Thanks

-
[475 Torque Amplifier] Is the thrust washer supposed to rotate freely or be fixed on the shaft? I replaced a bearing and the washer got stuck between shaft and bearing, rotating with the shaft. But when I look back at the video when I disassembled the parts, I could rotate the washer freely, it wasn't stuck then. I assume the washer has a function to supply oil to the gear(not on picture) because it has grooves in it and the bushing in the gear is brass and has oil groove. If the washer is not fixed and rotates with the shaft, shouldn't it supply the gear with the same amount of oil? - Or will a fixed washer cause hurtful friction when the gear rotates? The manual doesn't mention that I should take special care when installing a new bearing. What is correct? Thanks


-
It is common to read comments that old things are usually better than new, even regarding bearings. I have slowly renovated my torque amplifier and am almost done. The bearing that is in it is a Fafnir 6207 (England). It makes almost no noise when I spin it (dry) but sometimes it can sound/feel like hot one corn grain of gravel. So I bought a new SKF 6207 (Italy) from a physical SKF store. So I ask you. Is a 50 year old bearing better than a new one in your opinion as long as it doesn't sound like a gravel crusher? 😅
-
Today I'm wondering when you should, and shouldn't, secure the spring in seals with sticky grease? Is it only when installing by tapping it down with, for example, a hammer that you should use sticky grease to reduce the risk of the spring coming loose? - Or should you also do it when using a hydraulic press? Is there any occasion when you absolutely should not use this method? Thanks

-
What Is This Bearing Called and Is It Mounted Correctly?
Powerpoint replied to Powerpoint's topic in General Chat
Thanks. It is mounted in the same direction as the old one so I'm not worried, but I was just concerned about the strip design and whether them sticking out was a sign that I did something wrong while mounting it. I want to thank you all again for taking the time to educate me on all the questions and topics I have. The forum has been very valuable to me. 560Dennis: Thanks! I liked the animation on the linked page. -
Stuck Seal on Aluminium Thrust Bearing Carrier: How to Remove?
Powerpoint replied to Powerpoint's topic in General Chat
In case anyone reads this for their own project; I didn't use grease or Loctite. I used my Clutch Thrust Bearing Sleeve Carrier Laycock upside down, which fit well into the groove on the rubber seal and pressed it in straight away without any problems. 👍 When I was going to press the adapter in, I learned that Loctite 648 dries very quickly. I had spilled a little on top of the adapter, so I glued the metal washer I had put on top. Luckily, I realized this before I pressed the adapter into the material. 😂 It doesn't seem to be easy to clean the surface with brake cleaner spray, much less separate them. I've put them in diesel. It probably requires heat but then the adapter will be warped. Luckily I have another one so I won't spend much more time on it. -
I'm slowly working on my torque amplifier and I remember when I took it apart that this bearing felt strange, it got somewhat stuck on the axle. Its three thin plates stick out, and should theoretically rub against the shaft? I've installed a new one, and these thin plates also stick out and two will collide when I insert the shaft. Teach me what you know about these. 😊 Does this really count as a bearing, there are no rolling cylinders in it? Thanks


-
Stuck Seal on Aluminium Thrust Bearing Carrier: How to Remove?
Powerpoint replied to Powerpoint's topic in General Chat
Thanks. Regarding the input (adapter) sleeve and the new version of the seal, I wonder in what order I should mount these. I was thinking of applying Loctite 648/680 to the input sleeve and pressing it in, letting it cure for a week, and then pressing in the seal without Loctite, so it won't be too difficult to change the seal next time. Or should I press in both one after another without waiting for the Loctite to cure?
-
Stuck Seal on Aluminium Thrust Bearing Carrier: How to Remove?
Powerpoint replied to Powerpoint's topic in General Chat
Thank you for your patience and shared knowledge. I measured ~2.489" bore ID and 2.507" seal OD = 0.018" interference. 👍 -
Stuck Seal on Aluminium Thrust Bearing Carrier: How to Remove?
Powerpoint replied to Powerpoint's topic in General Chat
Sorry but I have continued to overthink this topic, and I just want to share with you what I have read and what I wonder, you are the one who has really worked with this before and your opinions would be interesting. Since this is not the same model as the original, I was curious to learn how to do it right. And I read that these that are completely covered with rubber, they can vibrate loose and there are those who suggest taking sandpaper, roughening up the outside and using loctite 243 (blue for thread locking). The data sheet says it can work with certain plastics and rubber. (The article that talked about it vibrating loose applied to cars or mopeds) But it doesn't feel good to start grinding on radial seals. So I went to a store that only sells bearings and seals, and asked if there was a special adhesive product. There was none. But in that case I could use 648(680) even though it claim only to be for metal surfaces. - But he said that this type of seal fits better than the old ones with visible metal and that it wouldn't vibrate loose at all if I had to press them down. It can be a pain to install but still easy to uninstall it self also... or not... I think you can explain how unnecessary it is for me to worry about this, so I'll relax and continue assembling. 😉 Thanks -
Stuck Seal on Aluminium Thrust Bearing Carrier: How to Remove?
Powerpoint replied to Powerpoint's topic in General Chat
Interesting. I thought about that option too but was afraid that grease would remain and make the seal lose its grip more easily and have the opposite effect to glue. Thanks. -
Stuck Seal on Aluminium Thrust Bearing Carrier: How to Remove?
Powerpoint replied to Powerpoint's topic in General Chat
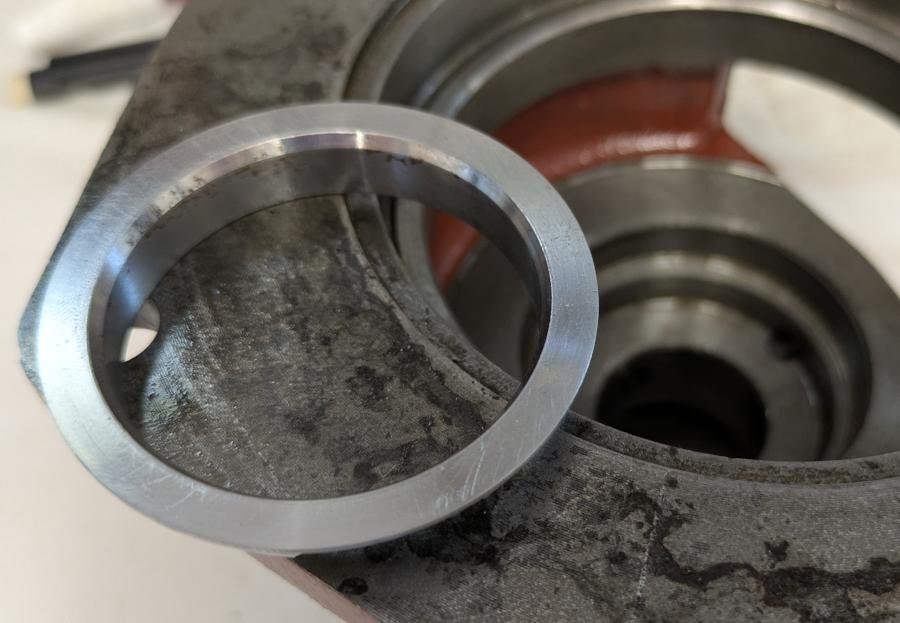
Hello and many thanks for the information and pictures. I intend to follow your advice about Loctite, 680 is not available here but I bought 648 which I interpret as equivalent but a little stronger. Although I have two follow-up questions on that subject: 1) 648 is for metal objects. Would you use any product to glue between aluminum goods and rubber seals? 2) Sometimes temperatures are also used, heating one part and cooling the other to make installation easier. In which cases is this method suitable, respectively unsuitable? Like in my picture below, I will press down an input sleeve, I'm thinking on putting the sleeve in the freezer first and maybe I will heat the housing in the oven + Loctite.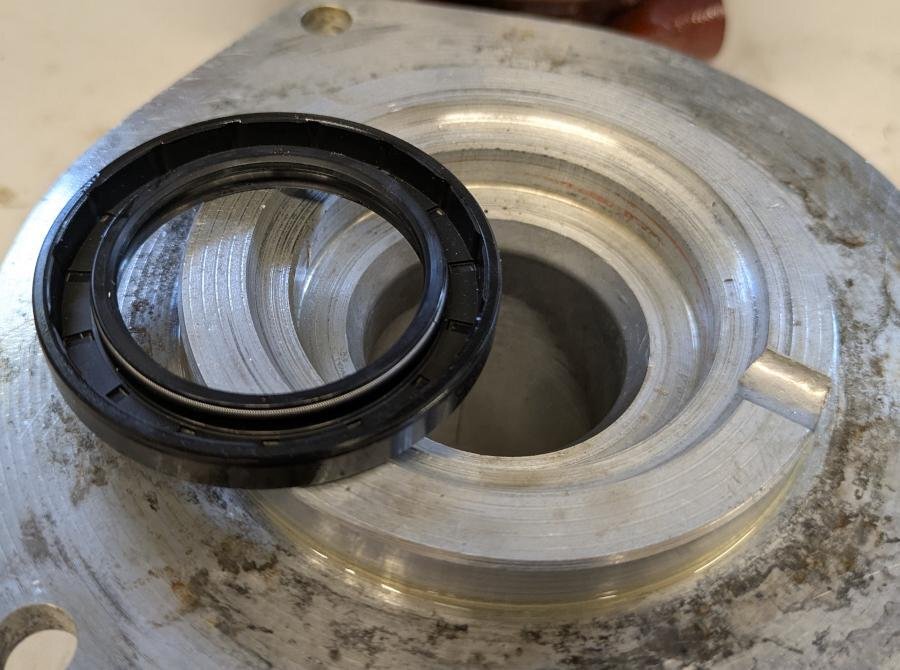
-
Stuck Seal on Aluminium Thrust Bearing Carrier: How to Remove?
Powerpoint replied to Powerpoint's topic in General Chat
Thanks. I used a drift pin and hammer to tap the sides down. Then oil, screwdriver and pliers, it finally came off and the aluminum is undamaged. I'm going to install some new seals "from the wrong side" so the open side is towards the tool. Is there a special method for doing this or is it just a matter of having the right diameter on the tool to just cover the thin sheet metal and hope it doesn't bend?
-
I'm trying to replace the seal on my thrust bearing carrier's aluminum sleeve snout, but it's stuck. I don't want to force it out with a screwdriver and risk damaging the aluminum. I've tried heating the whole thing up in the oven, but that didn't loosen it. I've seen some YouTube videos where guys have used welding to remove stuck parts, but the material is so thin on this one that I'm worried the carrier will get damaged. I'm thinking about trying to heat the seal up locally with a torch and cool it down quickly - I've seen some mountain bikers use this technique to loosen stuck parts on their bikes. How would you go about removing it? Thanks

-
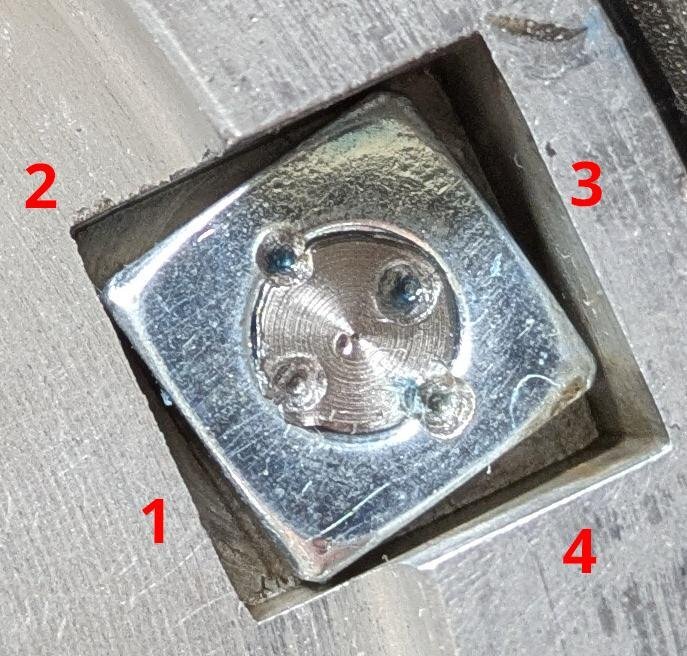
Finally it got warm enough to renovate again. It was late, and I had managed to finish the previous step, which made me excited about my Torque Amplifier. However, when I realized I had made a mistake with this step, panic set in, and I continued to make it worse. 🤯 I lack knowledge of how to hit to make a correct lock between bolt and nut. Can someone describe this, how to do it, what the method is called? Because I can't find any YouTube that shows it more than center wheel-nuts on sports cars. I have both the British and Swedish manuals and these differ slightly. The British "stake the bolts to the nuts in two places so that the bolts resist a minimum torque of 1.1kgm", and the the Swedish text says I should do the same, but also add locking oil, and it does not mention testing the resistance. 1) I applied blue Loctite to the nut to prevent spills downwards. However, afterwards I wonder if it causes too little to remain on the threads. Then I hit two points on the nuts, maybe slightly angled towards the bolt. 2) Then I realized it was wrong and I tried to hit two new ones on the bolts. In a state of panic, I started to reason that I should try closer to the center with the intention of pressing metal outwards towards the nut. But as the pictures show, I probably made mistakes on most of the strokes. I simply don't know what the goal is. Is it to "break" the threads (some YouTube mentioned to create a locknut), or to push the metal aside. In the pictures, I see that the metal of the bolt (#14) even got crack and one nut shows a gap from the bolt. I don't know how to describe the question, but maybe someone here is good at explaining how to do it correctly? (I'm going to buy new bolt and nuts) This is embarrassing to show, but it's part of learning-by-trying Thanks


-
Should Needle Bearings Be Greased Before Installation? [TA]
Powerpoint replied to Powerpoint's topic in Technical IH Talk
I looked for assembly lube, and the one with the most good reviews is Lucas. It claims to be compatible with all motor oils, but does that also apply to hydraulic oil (hy-tran)? I have the impression that hydraulic oils are more sensitive to contamination if you mix in other chemicals. When we're talking about assembly lubes anyway. I watch Jim's Automotive Machine Shop YouTube channel and they use ketchup, or at least ketchup bottles. Is that a common alternative? -
Hi. I wonder if I should grease needle bearings with grease during all installations? The manual does not mention anything regarding the replacement of this bearing in the TA, but on YouTube, it seems like everyone greases their new needle bearings with grease before installation in general. Is there a general mindset regarding which bearings should be lubricated and which should not before use? Most bearings today have sealed raceways, and I understand that one should not attempt to lubricate them with grease. But where is the line drawn otherwise? Thanks.

-
Typical. I didn't check every spare part in the kit but started the renovation, put the discs in oil, and then discovered that one gasket was wrong. 🫣 I took the discs out a few hours later and put them back in their wrapping. But I guess this isn't harmful? 🫤


